

2022/03/02 Unified Communications & Networking Solutions 425 visit(s)
Cetelecoms

At this moment, we can all agree that Cisco Meraki is currently the disputed market leader when it comes to simplicity, elegance, and efficiency with deploying, monitoring, and securing enterprise-scale networks.
However, we don’t think Meraki solutions are being highlighted enough especially what we call SD-WAN. So, what is SD-WAN and how to set it up for your enterprise network?
It’s an acronym for Software-Defined Wide Area Network, representing a suite of features designed to allow the network to dynamically adjust to changing WAN conditions without the need for manual intervention by the network administrator.
The wide area bit just means that the sites or networks you are looking to connect aren’t next to or local with one another.
The software-defined bit means that decisions about how traffic can route between all the sites in the WAN, is defined by policy, and its behavior adapts to the condition of the WAN as opposed to having a fixed configuration.
You might wonder how to achieve this; the answer is that SD-WAN comes with a set of features to help do the job:
Mainly, there are two main concepts or objectives that Meraki SD-WAN was designed for:
In networks with redundant uplinks, in the case where an uplink degrades, SD-WAN comes to the rescue by allowing the network to dynamically select the best route to the destination.
This comes in handy for latency-sensitive services such as VoIP and video.
Before deploying Meraki SD-WAN here are the prerequisites to meet:
Now that we have checked all the boxes, we can safely move to the setup process.
You can easily follow the steps below to get your SD-WAN up and running seamlessly:
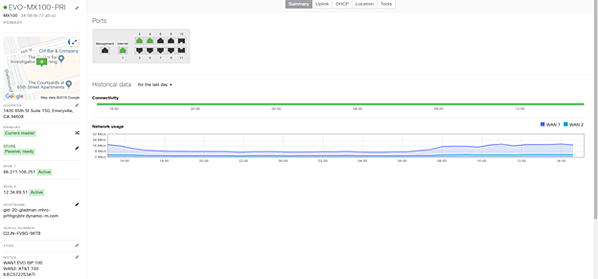
From your Meraki dashboard, you can move to Security & SD-WAN > Monitor > Appliance Status.
Then Adjust the actual circuit speed through Security & SD-WAN > Configure > SD-WAN & traffic shaping.
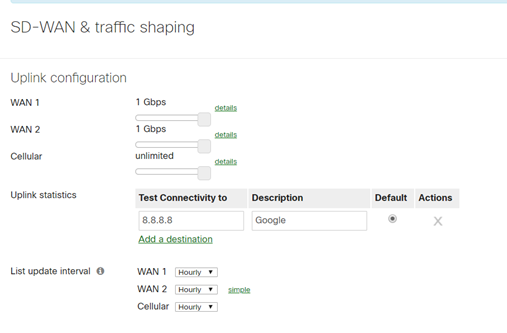
In Security & SD-WAN > SD-WAN & traffic shaping under Uplink>Global preferences enabled Active-Active AutoVPN.

Through Security & SD-WAN >Site-to-Site VPN, select Hub for the hub site and full mesh all remote sites.
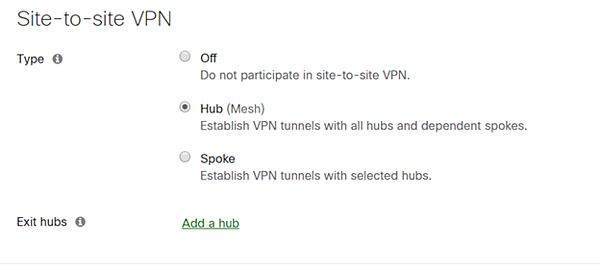
For a Hub and Spoke topology, select the spoke for the remote sites and then select the dedicated hubs.
Select whether to advertise the local networks by turning on or off VPN participation.
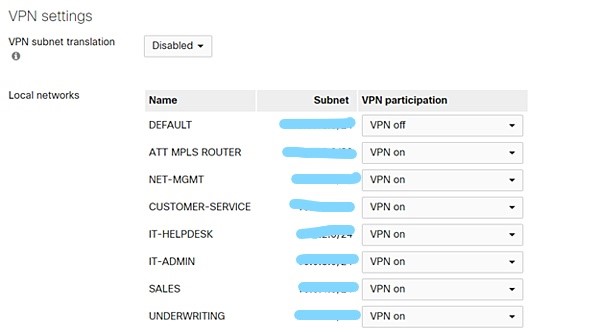
To view all VPNs connected to a site, just move to Security & SD-WAN >Monitor>VPN Status Where you can check average latency and usage.
Check the uplinks decision for each remote site alongside the SD-WAN policy that is being used.
Next, you can select a site and click on the connectivity bar on the right to view more statistics for the uplinks.
This next page will show the Latency, Jitter and Packet Loss for both uplinks.
In order to create an SD-WAN uplink policy choose to Add a Preference under SD-WAN policies and VPN traffic.
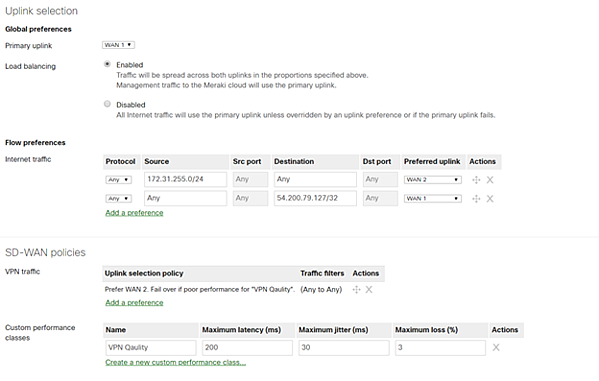
On this page, you can create a policy for voice traffic for instance and remember that the Preferred uplink is the best choice for VoIP.
Those were the steps in a nutshell. However, in the last step, you have lots of options to deal with in order to create the policy so feel free to explore.
When it comes to hardware limitations are there no matter what. Meraki’s product line designed for small branch offices is limited to 100-200 Mbps for VPN throughput, depending on the model of course, and we recommend no more than 50 client devices connecting through these appliances.
However, when dealing with a large network, you should create a network design involving hubs and spokes with the MX appliances.
Why? Simply because the hub and spoke design improves performance by limiting the number of SD-WAN VPN tunnels that must be established on the spoke MX devices.
Despite this hardware limitation, you can hack your way around it with the correct setup.
As you can see from this article, the setup process is as simple as 1,2,3. You can easily follow the steps and in the case of confusion, support is available 24/7.
Ctelecoms being a Cisco partner offer you full support regarding the Meraki solutions in general and SD-WAN in particular.
To learn more, you can visit our website and contact us any time: https://www.ctelecoms.com.sa/L123/SDWAN